September 14, 2026
By Brian Johnson, Building Biologist and Licensed General Contractor
Vapor Barrier Under Slab, Soil Treatment and Water Management
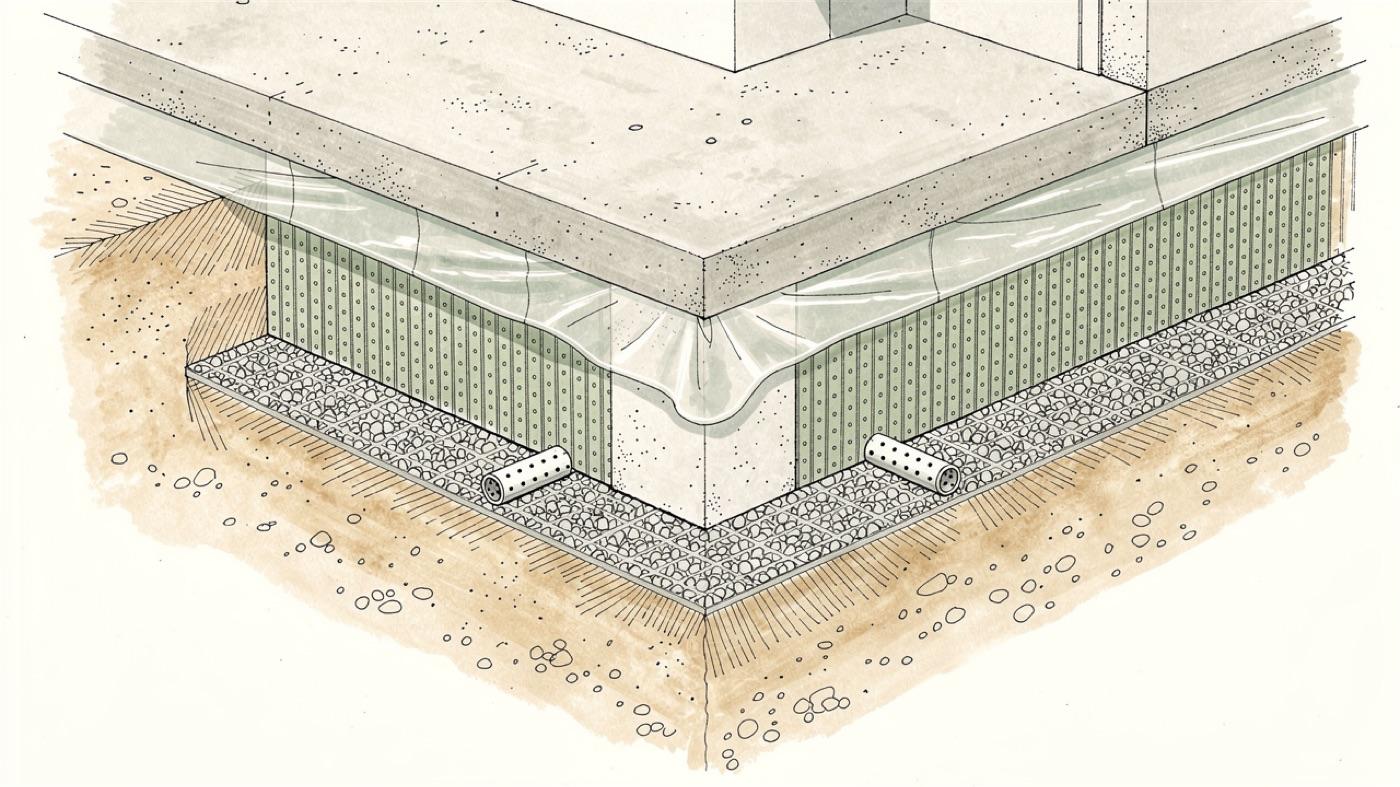
Everything below the floor decides how the rest of the house behaves. Soil moisture, soil gas and insects all want in, and a concrete slab alone stops none of them. A properly detailed vapor barrier under slab, non-toxic soil treatment and foundation water management keep them out for the life of the building.
At SENERGY360 we treat the foundation as the first line of the mold prevention principle. A dry, sealed base is cheaper than any remediation that comes later.
Vapor barrier under slab
Concrete looks solid, but it wicks water. Moisture from the soil moves up through a slab by capillary action and by vapor diffusion, then condenses under flooring or feeds mold in bottom plates.
A vapor barrier under slab stops that path. Done right, it is a continuous, sealed sheet that separates the concrete from the ground.
The assembly from the ground up
- Compacted subgrade
- A capillary break of washed gravel to stop liquid water wicking upward
- A heavy-gauge sheet vapor barrier laid directly under the slab
- Under-slab rigid insulation where the climate calls for it
- The concrete slab poured on top
Details that make or break it
The sheet is only as good as its seams. Laps are taped with the manufacturer's tape, and every pipe, conduit and column that passes through gets a sealed boot or collar.
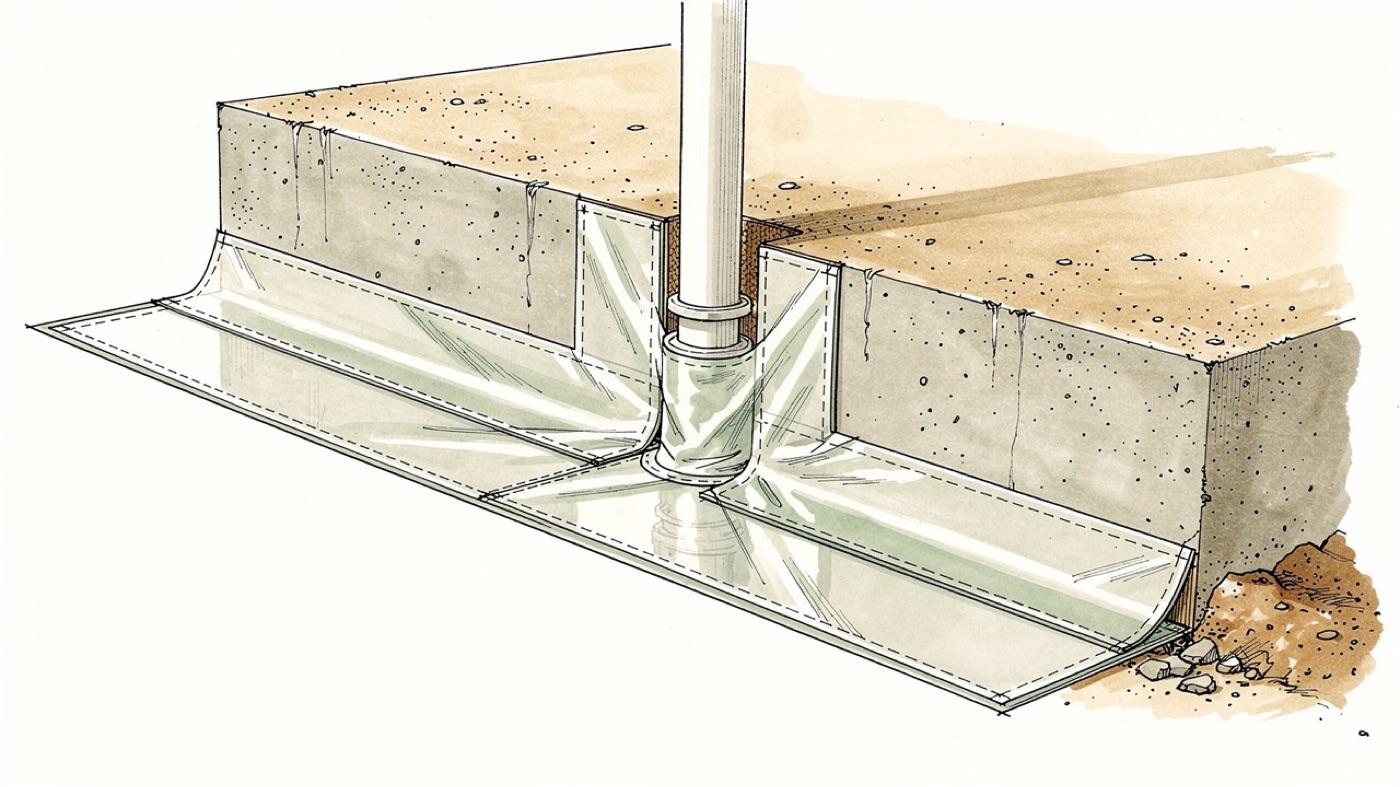
At the edge, the sheet turns up the stem wall and is sealed to it. Where radon or other soil gas is a concern, the same barrier becomes part of the gas control system, with a vented gravel layer below it.
The U.S. EPA's radon-resistant construction basics describe the same layers: a 4-inch layer of clean, coarse gravel below the slab so soil gases can move freely, with sheeting on top.
Place heavy duty plastic sheeting (6 mil. polyethylene) or a vapor retarder on top of the gravel to prevent the soil gases from entering the house.
The EPA also notes that the cost to the builder of including these features is typically less than the cost to mitigate the home after construction.
Thin, low-cost plastic tears during the pour. Specify a thicker sheet rated for under-slab use and keep foot traffic off it until the concrete goes down.
Non-toxic soil treatment
Conventional termite pretreatment soaks the soil under the slab with a chemical termiticide. That chemical sits inches below the living space for years.
We do not build that way. Physical barriers and low-toxicity materials handle termites without a chemical reservoir under the house.
Physical barriers instead of poison
- A continuous under-slab barrier membrane that doubles as the vapor barrier
- Fine stainless steel mesh collars around every pipe penetration, where termites would otherwise enter
- A band of graded particle stone along the foundation that termites cannot tunnel through
- Borate treatment of framing lumber above the slab, which is low toxicity to people
These methods are recognized alternatives to soil-applied termiticides. NC State Extension's guide to termite prevention for new construction lists stainless steel mesh, wrapped around foundations, pipes and posts, among the methods North Carolina permits for new homes, along with borate wood treatment, which must be done before siding and sheetrock are installed.
Our post on non-toxic pest and termite control covers these methods in detail, including the products we specify.
Water management at the foundation wall
Water that reaches a below-grade wall must be drained away, not held against it. Hydrostatic pressure finds every crack, and a damp wall feeds mold on the inside.
The dimple mat is the workhorse of this system. It is a dimpled plastic sheet that creates an air gap against the wall so water drops straight down to the footing drain.
Option A: waterproofing and dimple mat
The simplest below-grade wall runs, from the structure outward, a waterproof membrane, a protection board if the membrane needs it, the dimple mat and then backfill.
At the top, extend the dimple mat roughly 4 to 8 inches above finished grade. Install the manufacturer's termination strip, fasten it mechanically into the wall at about 12 to 16 inches on center, and add compatible sealant behind the upper edge if the manufacturer calls for it. Trim the excess after fastening.
Fasteners belong only at the upper edge, above the primary waterproofing exposure. Use corrosion-resistant masonry screws or concrete anchors. Small temporary tack points of a low-toxicity adhesive such as AFM Almighty, every 24 to 36 inches on the upper section only, can hold the mat while the strip goes on.
Option B: waterproofing, exterior insulation and dimple mat
Adding 2 to 4 inches or more of rigid insulation outside the membrane improves the wall thermally. It also creates the detail installers most often get wrong.
A termination strip fastened directly over foam compresses the foam. The strip deforms, the fasteners loosen over time and the dimple mat waves or pulls away from the wall.
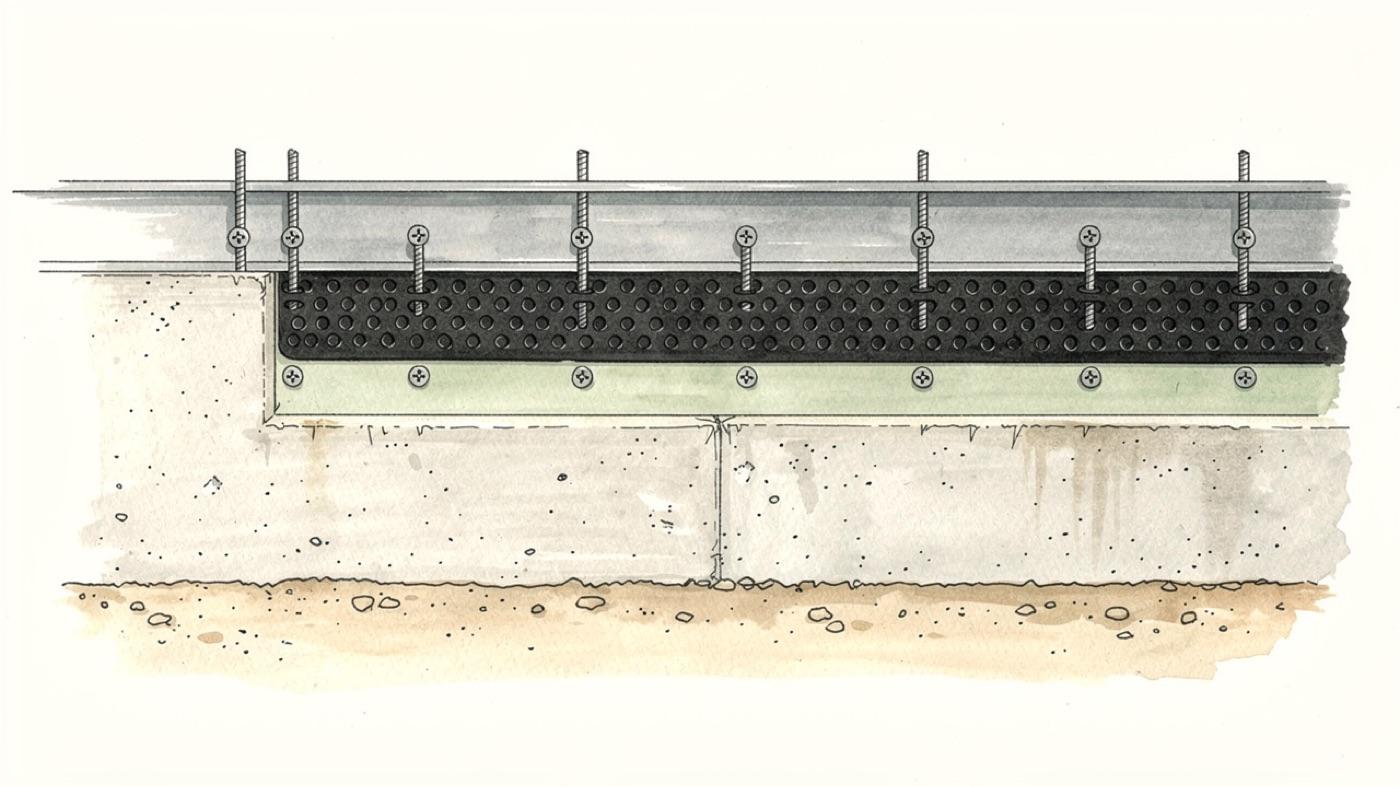
There are two ways to do it properly.
- A rigid termination strip with long fasteners that pass through the strip, the dimple mat and the insulation into the concrete or block, using larger washers or an engineered compression strip where needed
- A treated or composite nailer strip anchored to the wall first, with the insulation trimmed around it and the termination bar fastened to the strip
The nailer strip method is cleaner for insulation over 3 to 4 inches. It reduces foam compression and gives a solid base for anything attached later.
Sealant and the bottom edge
Apply compatible sealant behind the termination strip, at joints and around penetrations. Do not pile sealant below the strip where it would block drainage.
At the bottom, the dimple mat stops about 1 to 2 inches above the footing drain stone. It must never terminate into compacted soil. Water leaving the mat drops into washed gravel, then a perforated drain pipe wrapped in filter fabric, then out to daylight or a sump.
The SENERGY360 preferred assembly
Our standard below-grade wall stacks these layers from the structure outward.
- Waterproof membrane on the structural wall
- 2 to 4 inches of rigid insulation
- Dimple mat
- Termination strip mechanically anchored through the insulation to the structure
- Washed stone
- Perforated footing drain
- Free-draining backfill
That assembly handles water control, thermal control, hydrostatic pressure relief and foundation protection in one continuous system. It matters most on conditioned crawlspaces and on projects for mold-sensitive clients, and it is standard in our design-build work.
Why the details are the whole job
Every layer here is inexpensive on the day it is installed and nearly impossible to fix once backfill goes in. A torn barrier, a missing pipe collar or a termination strip screwed into foam will not show up for years.
The building science principle says water, air and heat must each have a continuous control layer. The foundation is where that continuity starts.